When working with a new prototype on my bench-top, I tend to use one single power supply to power it up. However, sometimes, I need to power up more circuits at once, possibly using different voltages. And it is in those cases that I am forced to use more than one power supply. There are also some cases where I need a dual power supply and, besides the case where I need a +/- 12V, I don’t have a power supply unit capable of giving me other dual voltage values. I even built a simple device, capable of converting a single dual power into a dual one, for those cases where I need it. But that converter is able to provide only a very small amount of power and that is not good when the powers involved are high.
At the end, I need a power supply unit capable of providing me with different voltages at the same time, possibly also current generators and, certainly, the possibility of having both single and dual power supply.
Units on the market capable of providing such features are very expensive, and they don’t even provide all the possible capabilities that I need while, instead, they provide other capabilities that I normally do not care about
To solve this problem, I decided to make my own power supply unit, capable of doing all the things that I find useful in my lab, and at a fraction of the cost of a professional power supply unit.
Let’s take a look at the schematic I designed.
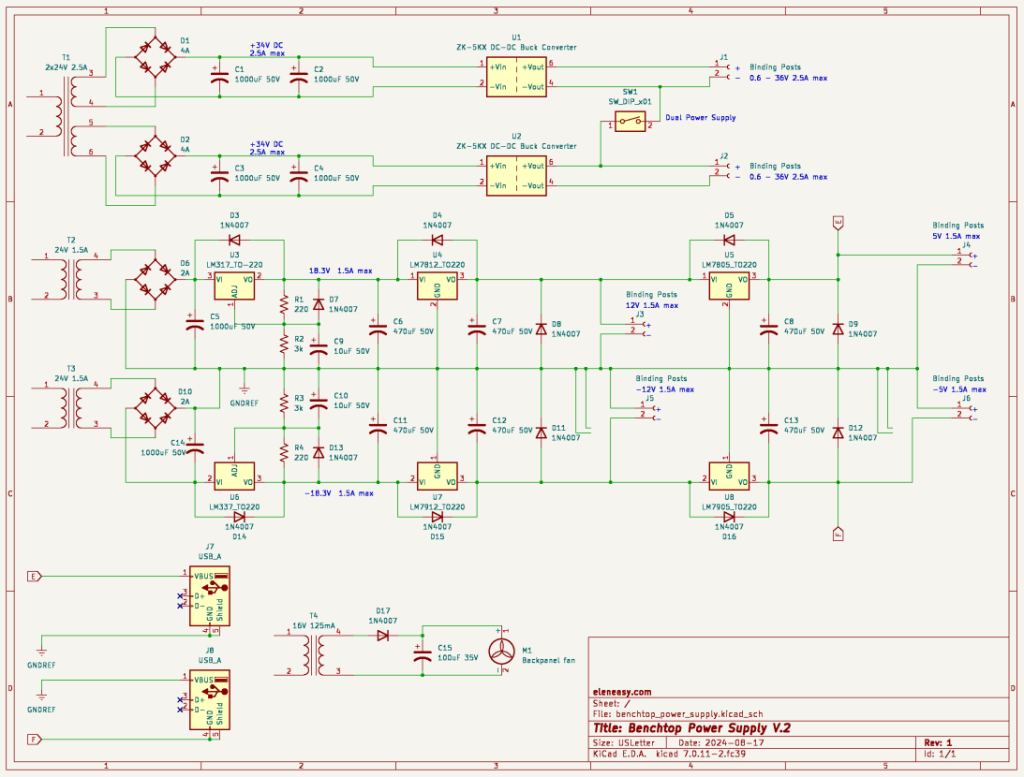
First, in order to be able to connect together a positive and a negative polarity, without having a short circuit, I needed to have totally separated circuits, with independent transformers, so that I could establish any point of reference on each transformer and connect together such points to obtain dual power supplies.
Because of that, I have a total of four transformers in this schematic.
The first on the top, though a single transformer, it provides two independent outputs on two independent secondaries. I used that transformer as the base for building two independent variable power supplies that could be connected together through a switch to obtain a single variable dual power supply, with the two branches independently regulated, useful in certain situations.
The next two transformers, which have exactly the same characteristics, are used to power up the two sides of a fixed dual power supply. One transformer is used for the positive output with respect to the reference point, and the other transformer is used for the negative output with respect to the reference point.
The fourth and last transformer, on the bottom left, is a very small one used solely to provide the power to move a cooling fan for the power supply case.
The two variable power supplies are each made around a buck/boost converter manually controllable, which works both as voltage and current generator and also provides a display to visualize various parameters.
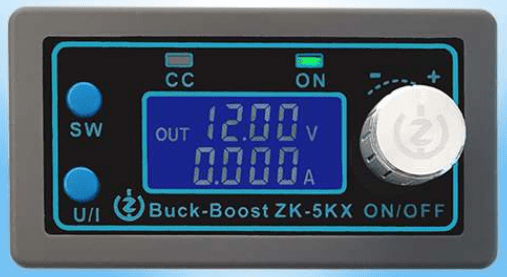
Here is the user manual of this little device.
It has several types of protection, it can be powered with a voltage anywhere in between 6 and 36V, and it can provide a voltage output between 0.6 and 36V, with a maximum current of 5A which can also be regulated, therefore offering the capability of working as a current generator.
It is also very easy to setup and use. It has a 4 wires connector. Two wires provide the input DC voltage and two wires provide the regulated output, either as voltage or current generator.
The manual goes on explaining how to use the rotary encoder and the two auxiliary buttons on the front panel, as well as the dimensions necessary to accommodate the devices on a larger panel of a bigger device.
Going back to our schematic, you can see that I used two of those regulators, represented here with the two blocks. So, each secondary of the large transformer is independently rectified and filtered by this section, to obtain a DC voltage of 34V with up to 2.5A. This two DC voltages go to the input of the power regulators and the outputs are available at the corresponding binding posts on the power supply front panel. Note also the switch that connects together the negative pole of the upper regulator with the positive pole of the lower regulator, to eventually provide a dual power supply where each branch can have and independent value of voltage or current.
The second section, with the two smaller transformers, is the one that provides the fixed voltage power supplies, very useful when working with devices like op-amps, for example, or any other device that needs to be fed with a dual power supply.
The secondary of both transformers T2 and T3 go each through a bridge rectifier and a filtering electrolytic capacitor.
From there, the positive voltage section is made of 3 separate regulators:
– an LM317, which brings down the DC voltage to a more comfortable value for the next regulators
– an LM7812, that provides a +12V to a corresponding output binding post.
– an LM7805, that provides a +5V to yet another output binding post.
Each of the 3 regulators has its own filtering capacitor, to minimize the residual ripple present to the voltage because of the rectification of the AC power provided by the transformer.
You can also see a number of diodes 1N4007, used as a protection for the solid state regulators during the power down of the whole power supply device.
The negative voltage section works exactly the same way, but uses the negative voltage regulators LM337, LM7912, and LM7905.
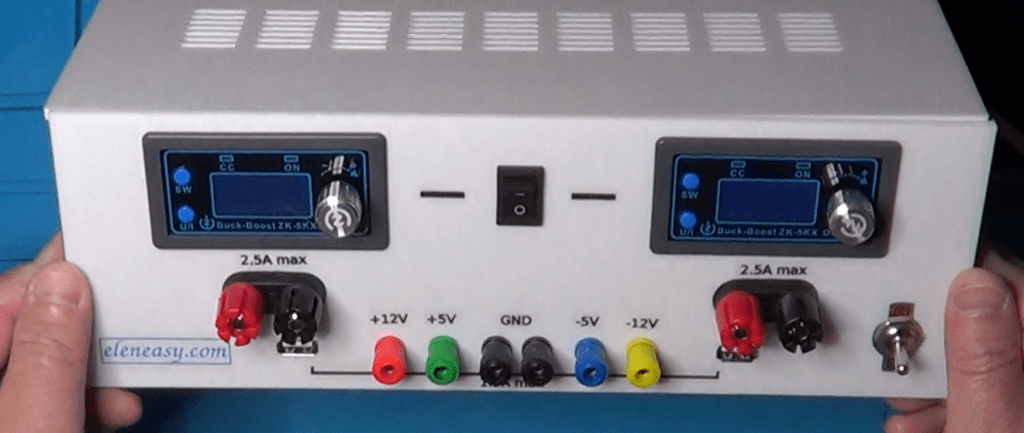
Another useful feature of this power supply system is the availability of two USB connectors on the front panel, used essentially to provide a 5V power supply, to power USB based devices, or to simply charge the battery of a device that has a USB power connector.
These two USB outlets are visible at the bottom left of the schematic, and it is perfectly visible that only pins 1 and 4 are used, which are those providing the 5V. The data pins 2 and 3 are not even connected.
Finally, the schematic shows also the last transformer, with its own half-wave rectifier and filtering capacitor that powers the cooling fan for the entire case. Why not, since I had laying around that little transformer for which I don’t have any other use.
And now, if you are interested in making your own power supply system, I suggest you to take a look at the video presented below, where you can found details on how to make also your own case for the device, as well as a number of useful information for its assembly.