Back To Basics Episode 4: Let’s Talk About Resistors

Hi there! Welcome to the fourth episode of Back To Basics, where we explore everything electronics from the beginning.

It is time to start learning about components, and what’s better than beginning with the ubiquitous resistor, a component present in each and every electronic circuit.

We will cover some theory, the math, and the major kind of resistors available on the market. All with a very simple approach that will help you understand what resistors are for, and which one to choose for your own projects and experiments.

Controlling The Flow


Before we get to the components, let’s look at the three ways materials behave electrically.

There are three fundamental kind of materials:

  • conductors,
  • insulators, and
  • resistors

Conductors allow current to flow very easily, like for example in copper wires. They have a high conductivity, which translates in a very low resistance.

Insulators are the opposite of conductors. They block the current flow, like for example with rubber or plastic. They have a very low conductivity, which translates in a very high resistance.

In between these two categories we have the resistors, which are capable of controlling the current flow. They lay in between the conductors and the insulators in terms of conductivity, having very specific values of resistance.

You can view resistance like a water pipe. Conductors are very large water pipes, which offer minimal resistance to the flow of water, here representing the electric current.

Insulators are totally clogged pipes, where the flow of water is totally stopped.

And finally the resistors, which are like water pipe of a specific section, so that they limit the flow of water to specified amounts.

The Fundamental Rule: Ohm’s Law


The math that governs the current flow through a resistor is called Ohm’s Law, and it is the most important concept in electronics.


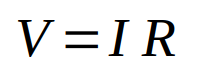
Here is the formula:

V = I R

where:

V is the voltage, or the entity that forces the current to flow, which is measured in Volt; I is the current, or the flow rate of the charges, which is measured in Ampere; R is the value of the resistance, or the entity that opposes to the flow of current, which is measured in Ohm.

Resistor Calculations: Series And Parallel

Most of the time we need to create circuits with multiple resistances, connected in various ways. Two most common ways of connecting components are the series connection and the parallel connection.In both case, resistors can be replaced with an equivalent resistance.


Here is an example of two resistors, R1 and R2, connected in series. When resistors are connected this way, there is only one path for the current and the equivalent resistance R3 is just the sum of the resistances in series.


And here is an example of two resistors connected in parallel. In such cases, the current splits into multiple paths when it enters the parallel, and it regroups when it leaves the parallel. The equivalent resistance is the reciprocal of the sum of the individual reciprocal resistances.

Note the simplified formula on the right, only valid in the case of only two resistances in parallel.


You can see that when resistors are in series, the total resistance increases, while when the resistors are in parallel, the total resistance is smaller that the smaller resistor in the parallel connection.

Practical Example

Let’s put this information into practice.

Let’s say we have a 9V battery, a resistor, and a LED. Knowing that the current that must flow through the LED is 20mA, and that the voltage at the LED is 2V, what’s value of resistor we have to put in series to the LED to limit the current to the 20mA value?

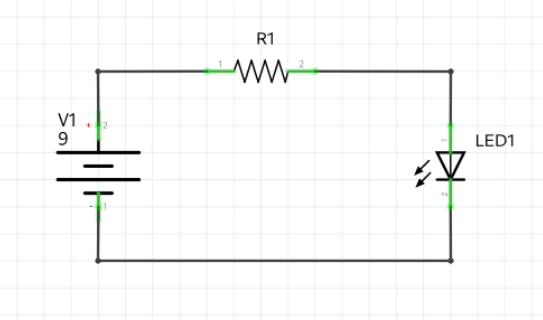
Since the three components are all in series, the current will be the same through all of them. Since we want a 20mA current through the LED, then also the resistor will be traversed by a current of 20mA. Additionally, the volt at the resistor is given by the difference between the voltage value on the left and the one on the right. The voltage on the left is the battery voltage. The voltage on the right is the voltage required by LED, which is 2V.

Using Ohm’s law, we can therefore write:


So, in practice, if we want to power an LED using a voltage source of 9V, we need to put a resistor in series with a value of 350 Ohm.

Physical Components: Types Of Resistors


Let’s now take a look at the kind of resistors we can find on the market and how they are made.

We have two main categories based on the physical aspect of the resistors:

  • through hole resistors, or THT resistors, usually in the shape of a cylinder with two wires coming out of them, and
  • surface mounted resistors, or SMT (or SMD) resistors, usually in a cubic and small shape.


We can also categorize resistors as fixed or variable. All fixed resistors can be either THT of SMD resistors. The variable resistors can be mechanically variable, thermally variable, or electromagnetically variable.


A typical example of mechanically variable resistors are the potentiometers, which usually have three terminals, the usual two at their two ends, and a third one, connected to a sliding connector touching the resistive material between the two ends. Measuring between one of the two end terminals and the slider, we can obtain all the resistance values between zero and the nominal value of the potentiometer.


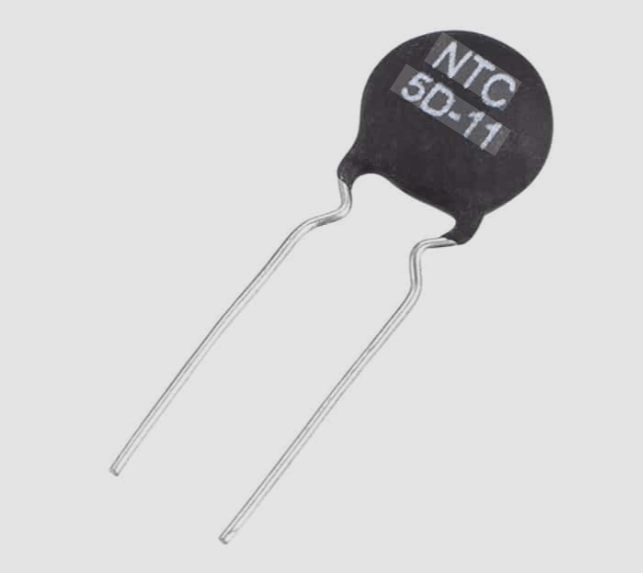
Thermally variable resistors are usually called thermistors. They have two leads, and their resistance value changes with the temperature.


An example of electromagnetically variable resistor is the photo-resistor, a resistor that changes its resistance with the intensity of the light.


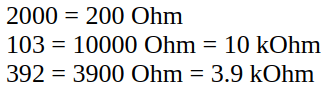
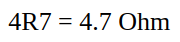
The resistance value of resistors can be imprinted on the resistor itself in two different ways, depending on the kind of resistor. It can be just printed using only numbers, the last of which always represents the number of zeros following the other numbers. Or it can be printed using numbers and the letter R, which represents the decimal point. Or it can be imprinted in the form of colored bands.


Here are a few of examples of number representations:


And here is an example with numbers with a decimal point:

When using colors, instead, we can have from a minimum of 3 bands, to a maximum of 6.

Here is the decoding chart to interpret the resistance value, the tolerance and, eventually, other information. You can find similar charts with a simple google search.


One last classification of resistors is based on the material used to make them. We can have:

  • carbon film resistors, made depositing a thin layer of carbon, usually graphite, on a ceramic or paper substrate
  • metal film resistors, made of a thin layer of metal deposited on a cylindrical support


The final, but not the least important, specification about resistors is their power dissipation capability or power rating. The power rating depends on the type of material they are made and the type of material of their support, as well as their size and the presence of a aluminum heat sink. the numbers can vary from 1/8W, going to 1/4W, 1/2W, 1W, and so forth, up to the hundreds of Watt.


When calculating the value of a resistor, never forget to calculate also the power it will need to dissipate, and always choose a resistor that can dissipate at least that amount of power.

For example, let’s get back to our example of resistor limiting the current in a LED. To calculate the power dissipation, we can use either one of these formulas:


n our example, we know the value of the resistor and the current that flows through it, so we can write:


Therefore we can use a resistor capable of dissipating 1/8W, equal to 0.25W, since its rating is greater than the actual dissipated power.


Don’t forget: always use a resistor with a rating higher than the calculated power, or the component may burn or even explode.

Conclusion


Well, now you know the theory behind resistance, how to use Ohm’s Law, how to calculate series and parallel equivalents, and how to physically identify the component you need.


In the next episode, we will dive deeper into the Kirchhoff’s Laws, which build on top of everything we covered today.

Happy experiments!!!

Back To Basics Episode 2 – The ABC Of Electricity: Voltage, Current & Resistance

Welcome to the second episode of the series “Back to Basics”.

Did you ever wonder what’s actually happening inside a wire when you flip a light switch? What is electricity really?

People knew about electricity since a very long time, but although they observed the related natural phenomena, they didn’t know how to explain them.

They could see a thunderstorm and a lot of lightning, but they didn’t know what lightning was and so they attributed it to angry divinities that used the thunder bolts to punish bad people.

They could stroke a bar made of amber and they would see it attract light pieces of other materials. But they didn’t know why that was happening so they attributed that phenomena to magic.

It was only in the 19th century that humanity finally got a better understanding of electricity. They understood the physical principles behind it and learned how to use it, first for their own pleasure, then for actually do some work to help themselves.

And finally we learned how to use electricity to do the most incredible things: light up our houses, create radios, TVs, computers, robots, and everything you can think of today.

If you would like to understand more about electricity and, maybe one day, be able to bend it to your will, just follow me in this series and its companion videos on YouTube. Through that, you will learn concepts like voltage, current, resistance, capacitance and inductance; and you will learn how the devices around us are made of, and about the electronic components.

And, moving forward, you will learn how to build new things out of those components and, who knows? Maybe one day you will be the great inventor that will revolutionize again our society.

Let’s start today with some basic concepts: voltage and current, and how they are related to each other.

What Are Voltage And Current?

What is voltage? Think of it as of some form of energy that moves things around. The typical example is a river that flows down a hill.

The height of the hill from which the water flows represents the voltage, which is measured from the bottom to the top of the hill. The higher the hill, the higher is the potential energy of the water, and the higher is the voltage. If you’d like to go a little deeper on the concept of voltage, you may want to watch this video:

The current, instead, is made of all the droplets of water that flow down through the river. Such droplets, in terms of electricity, are called electric charges.

The height of the hill is the same as the voltage of a battery, the wire connected to the battery is the bed of the river, and the water that flows in the river is the electric current in the wire.

The higher the hill, the more water will flow down the river. The higher the voltage of the battery, the more electric current will flow in the wire.

For more details on the concept of current, you may want to watch this video:

We measure the voltage in Volt and the current in Ampere. We usually represent these measurement units with the letters V and A. And we can measure these entities with instruments that are called volt-meters and ampere-meters, or am-meters for short, just like we measure the height in meters and the amount of water that flows down the river in liters/second.

Well, yes, in US people is more accustomed with yards and gallons than meters and liters, but you got the point.

In more precise terms, volt is the ratio between the potential energy provided by a battery and the amount of charge needed to generate it.

Current, on the other end, is the amount of charges flowing through a section of the wire in one second.

Back at the beginning of the 19th century, an Italian scientist named Alessandro Volta was conducting experiments on frogs.

He discovered, inadvertently, that touching a dissected leg with two metal sticks made of two different materials, the leg contracted, as if it was still alive. Curious about what happened, he started experimenting with different metals and different watery solutions mimicking the fluids in the frog’s leg. Soon, he discovered a way to generate electricity. He just invented the battery, which he called pile, since it was made of a pile of metal and paper disks, moistened with an acidic solution.

Today, we call that device a voltaic pile, made of several voltaic cells, to honor the inventor of the device that revolutionized our civilization.

After that, other people started experimenting with this newly found source of electricity, and names like Georg Simon Ohm and Andre’-Marie Ampere became famous in that same century. Yes, just about 200 years ago.

What Is Resistance?

In particular, Andre’-Marie Ampere found a way to measure the current flowing in a piece of metal when a voltage was applied to it.

Georg Ohm, instead, used the voltaic pile to run experiments on different kind of materials, to figure out how they behaved when in the presence of a voltage.

He prepared a set of metal bars of different materials and same section, connected each bar to the pile, and measured the amount of current that was flowing through. Then he changed the voltage applied to the bar, by increasing or decreasing the number of cells in the pile.

And with that he discovered that for the same bar, the ratio between voltage and current, whatever the voltage was, never changed. He called this ratio the resistance of the material. And he further discovered that different materials have different resistances.

Ohm’s Law

Today, we have named Ohm the measurement unit of the property he discovered, and we represent it with the Greek letter Omega, which sounds like the initial of the name Ohm.

We write that the Voltage V and the current I are directly proportional as per this formula

where R, the resistance, is the constant of proportionality.

In terms of their measurement units, we also write

This is what we call “Ohm’s Law, which is the foundation for the calculations of voltage and current in any electric and electronic circuit.

As you can see, the three concepts of voltage, current and resistance are not independent; they are all linked together by the fundamental principle called Ohm’s law. On the same resistance, more voltage causes more current to flow. With the same voltage, a higher resistance allows a smaller current to flow. And with the same current, a higher resistance causes a higher voltage.

Conclusion


I hope this helps demystifying the very basic concepts of electricity. In the next episodes we will go deeper into these concepts, we will learn how to measure these entities, we will learn about electronic components, how to use them in circuits, learn how to read schematics, and so forth. Please let me know in the comments what concepts you are more interested in, so I can better aim this series of tutorials to your likes.

Finally, if you like, you can also watch the video version of this post:

How To Choose A Resistor

How do we choose the right resistor when designing and building an electronic circuit? Here are the major parameters that should be kept into account.

bunch_of_resistors

A resistor is a component made out of a poor conducting material, so that it can offer a resistance to the flow of the current.

You can think to resistance in terms of the obstacles that charges encounter when moving from one end to the other of a conductor. The more obstacles, the higher the resistance. In a metallic wire, for example, the charges are the electrons of the conduction band (see this post and this other one for further details).

In today’s post I would like to address an issue that sometimes is underestimated when designing an electronic circuit: how to choose the right resistor for the job.

Resistors are not all the same. Besides the resistance value that distinguishes one from the other, there are other factors that are important as well.

Here is a list of all the important factors, why they are important, and what are the consequences of not choosing a resistor based on each specific factor.

  • The first thing that comes to mind is the tolerance, which is usually provided on the body of the resistor itself, along with its resistance value.

resistor_color_bands

In color coded resistors, the tolerance is defined by the band that is far away from all the others. In the above picture, for example, it is the gold band, which means that the tolerance is of 5%. In other resistors, where the resistance is explicitly written on the body of the resistor, the tolerance is usually written in clear along with the resistance. More in general, you’ll have to refer to the data sheet provided by the constructor to figure out its tolerance.
Tolerance is an important factor for those circuits that require very precise resistors, like measuring instruments and the like. It is also important when the resistor is used for the polarization of a critical component. If the resistors used in the project have a tolerance that is too high, the whole circuit may not function properly because the actual value of the resistor is too different from the one that was required.

  • Operating Temperature. This depends both from the ambient conditions and by the temperature raise produced by the power dissipation. There are two reasons to keep the temperature range into account. First, resistors slightly change their resistance with the change of the temperature. Using the resistor outside its temperature range would cause a variation greater than the one considered by the tolerance. Second, but not last, when the resistor is traversed by current it heats up. As long as the current stays within a range for which the power dissipation is not exceeded, everything is fine. Otherwise, the resistor can easily overheat and burn.

scorched_resistor

  • Maximum Voltage. Operating a resistor above its maximum voltage rating may cause sparks that would destroy the resistor.

burned_resistor

Resistors used in low power circuits usually have a maximum voltage in the order of at least 100V, and that’s why people usually don’t care or it doesn’t even know that there is such a parameter. In fact, low voltage circuits will normally never exceed the maximum voltage of any resistor. However, there are specific applications where voltages in the circuits can be above the 100V threshold. In such cases, it is important to verify that the resistors used in the circuit can withstand those voltages.

  • Temperature coefficient. This is the parameter that tells us how much the resistance changes per degree Celsius. It depends on the material the resistor is made of, but also on the heat dissipation capability of the component. Some resistors are built with an embedded heat sink to reduce the value of this factor.

power_resistor

This information becomes important in those cases where it is known that the resistor is going to dissipate a considerable amount of power. Based on that, it is possible to figure out if the resistor needs an external heat sink and, eventually, the heat sink thermal resistance.

  • Parasitic Capacitance and Inductance. A real resistor does not have only a resistance but also a very low value of capacity and inductance that may affect its functionality at high frequencies.

equivalent_resistor

These parasitic capacitance and inductance are caused by the physical dimensions and shape of the component and cannot be avoided. When working at high frequencies, these values need to be taken into account, since they will generate both capacitive and inductive reactance that will affect the value of the resistor at the particular frequency it is going to be used.

  • Packaging. This keeps into account where and how the resistor is going to be mounted. It can be a through holes resistor, which is provided with two leads to make the connections. The leads are usually inserted in the holes of a perforated board or of a Printed Circuit Board (PCB). Or, the resistor can be a Surface Mounted one. This has no wires, just two pads that can be directly soldered on a Surface Mounted technology (SMT) PCB. Other factors affecting the packaging include the possibility of attaching it to an external heat sink, and/or the necessity to properly ventilate it, to guarantee enough heat dissipation.